[vc_row][vc_column width=”1/3″][vc_single_image image=”3419″ css_animation=”appear” border_color=”grey” img_link_target=”_self” img_size=”full”][/vc_column][vc_column width=”2/3″][vc_column_text]This tutorial has been updated for Hog4.
The complete Quick Start Guides are also available in PDF form below.[/vc_column_text][vc_button title=”Hog 3 QuickStart Guide” target=”_self” color=”btn-primary” icon=”wpb_document_pdf” size=”btn-small” href=”https://vd4bc0b0xc9.c.updraftclone.com/pdf/hog/Hog3-Quickstart.pdf”][vc_button title=”Hog 4 QuickStart Guide” target=”_self” color=”btn-inverse” icon=”wpb_document_pdf” size=”btn-small” href=”https://vd4bc0b0xc9.c.updraftclone.com/pdf/hog/Hog4-Quickstart.pdf”][/vc_column][/vc_row][vc_row][vc_column width=”1/1″][vc_text_separator title=”Playing Back Cues on a Master” title_align=”separator_align_left” color=”blue” style=”double”][/vc_column][/vc_row][vc_row][vc_column width=”1/4″][vc_column_text]![]()
 [/vc_column_text][/vc_column][vc_column width=”3/4″][vc_column_text]
A Cuelist does not have to be on the Chosen Master in order to be played.
To trigger a Cue:
– Press the GO (Play) key on the Master or
– If the Cuelist’s Master is Chosen, you can use the larger GO (Play) in the Main Playback (Ensure that the Master’s Fader is up)
To Pause a Cue During a Crossfade:
– Press the HALT (Pause) key on the Master or
– If the Cuelist’s Master is Chosen, you can use the larger HALT (Pause) in the Main Playback
To skip between Cues:
1. Press the CHOOSE key above the Master containing your Cuelist
2. Press the SKIP FORWARD or SKIP BACKWARD keys in the Main Playback
To jump to a Cue:
1. Press the CHOOSE key above the Master containing your Cuelist
2. Press the GOTO key
3. Key in the number of the Cue you wish to jump to
4. Press ENTER
Controlling Intensity of Playback:
– Move the Master’s Fader to proportionately affect the Intensity output of the cuelist.
– The Flash key at the bottom of the Master can be used to “bump” the Intensity to 100%
[/vc_column_text][/vc_column][/vc_row][vc_row][vc_column width=”1/1″][vc_text_separator title=”Playing Virtual Cuelists” title_align=”separator_align_left” color=”blue” style=”double”][/vc_column][/vc_row][vc_row][vc_column][vc_column_text]
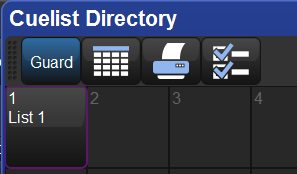
1. Open the Cuelist Directory by holding the OPEN key and pressing LIST
2. Ensure that the GUARD button in the Directory is off.
3. Touch (select) the List you wish to trigger.
Note: Alternatively, you can type the list you wish to trigger, followed by ENTER. (Example: LIST 12 ENTER)
[/vc_column_text][/vc_column][/vc_row][vc_row][vc_column width=”1/1″][vc_text_separator title=”To Release a Cuelist on a Master” title_align=”separator_align_left” color=”blue” style=”double”][/vc_column][/vc_row][vc_row][vc_column][vc_column_text]
1. Press the CHOOSE key on the Master containing your Cuelist
2. Press the RELEASE key
[/vc_column_text][/vc_column][/vc_row][vc_row][vc_column width=”1/1″][vc_text_separator title=”To Release a Virtual Cuelist” title_align=”separator_align_left” color=”blue” style=”double”][/vc_column][/vc_row][vc_row][vc_column][vc_column_text]1. Press and hold on the List item in the Cuelist Directory
2. Press RELEASE[/vc_column_text][/vc_column][/vc_row][vc_row][vc_column width=”1/1″][vc_text_separator title=”To Release all Playback (all Cuelists and Scenes on all Pages)” title_align=”separator_align_left” color=”blue” style=”double”][/vc_column][/vc_row][vc_row][vc_column][vc_column_text]
1. Hold the PIG key
2. Press RELEASE
[/vc_column_text][/vc_column][/vc_row][vc_row][vc_column width=”1/1″][vc_column_text css=”.vc_custom_1407377918956{background-color: #ff0033 !important;}”]
Next up…
[/vc_column_text][/vc_column][/vc_row]