[vc_row][vc_column width=”1/3″][vc_single_image image=”3419″ css_animation=”appear” border_color=”grey” img_link_target=”_self” img_size=”full”][/vc_column][vc_column width=”2/3″][vc_column_text]This tutorial has been updated for Hog4.
The complete Quick Start Guides are also available in PDF form below.[/vc_column_text][vc_button title=”Hog 3 QuickStart Guide” target=”_self” color=”btn-primary” icon=”wpb_document_pdf” size=”btn-small” href=”https://vd4bc0b0xc9.c.updraftclone.com/pdf/hog/Hog3-Quickstart.pdf”][vc_button title=”Hog 4 QuickStart Guide” target=”_self” color=”btn-inverse” icon=”wpb_document_pdf” size=”btn-small” href=”https://vd4bc0b0xc9.c.updraftclone.com/pdf/hog/Hog4-Quickstart.pdf”][/vc_column][/vc_row][vc_row][vc_column width=”1/1″][vc_text_separator title=”AutoPalettes” title_align=”separator_align_left” color=”blue” style=”double”][/vc_column][/vc_row][vc_row][vc_column][vc_column_text]
1. Open the Fixture window by holding the OPEN key and pressing the FIXTURE key.
2. At the top of the Fixture window, press AUTO PALETTES
3. In the Pop-Up window, click GENERATE
[/vc_column_text][/vc_column][/vc_row][vc_row][vc_column width=”1/1″][vc_text_separator title=”Recording Groups” title_align=”separator_align_left” color=”blue” style=”double”][/vc_column][/vc_row][vc_row][vc_column][vc_column_text]
1. Select the fixtures that you wish to store in the Group by keying in their User Numbers.
2. This will put those fixtures into the Programmer.
3. Ensure that the fixtures you want stored are Actively Selected (these are the fixtures listed in dark blue in the Programmer window)
4. Press the RECORD key and touch any empty box in the Group Directory window.
5. Press the SET key and enter a name, followed by ENTER
6. Clear the Programmer by pressing the CLEAR key.
Hint: I always recommend testing objects immediately after creation. For Groups, simply touch the Group you just created and confirm that the correct fixtures have been sent to the Programmer window. If you realize you made a mistake, you can use my favorite button: UNDO (available on the main toolbar at the bottom of the right monitor) to move backwards in your work and recreate the information correctly (hopefully) the second time.
[/vc_column_text][/vc_column][/vc_row][vc_row][vc_column width=”1/1″][vc_text_separator title=”Recording Palettes” title_align=”separator_align_left” color=”blue” style=”double”][/vc_column][/vc_row][vc_row][vc_column][vc_column_text]
1. Select the fixture(s) you wish to work with in the Programmer window.
2. Modify their attributes to create the look you wish to store.
3. Press the RECORD key
4. Touch (or select) any empty Palette (Intensity, Position, Colour, Beam) Directory box to store to.
5. Press the SET key and enter a name followed by the ENTER key.
6. Clear the Programmer by pressing the CLEAR key.
[/vc_column_text][/vc_column][/vc_row][vc_row][vc_column width=”1/1″][vc_text_separator title=”Overriding Palette Defaults” title_align=”separator_align_left” color=”blue” style=”double”][/vc_column][/vc_row][vc_row][vc_column][vc_column_text]
1. Select the fixture(s) you wish to work with in the Programmer window.
2. Modify their attributes to create the look you wish to store.
3. Press the RECORD key
4. From the Record toolbar (in the popup at the bottom of your right monitor), click the mask(s) (Intensity, Position, Color, etc.) for the KIND(s) you wish to store.
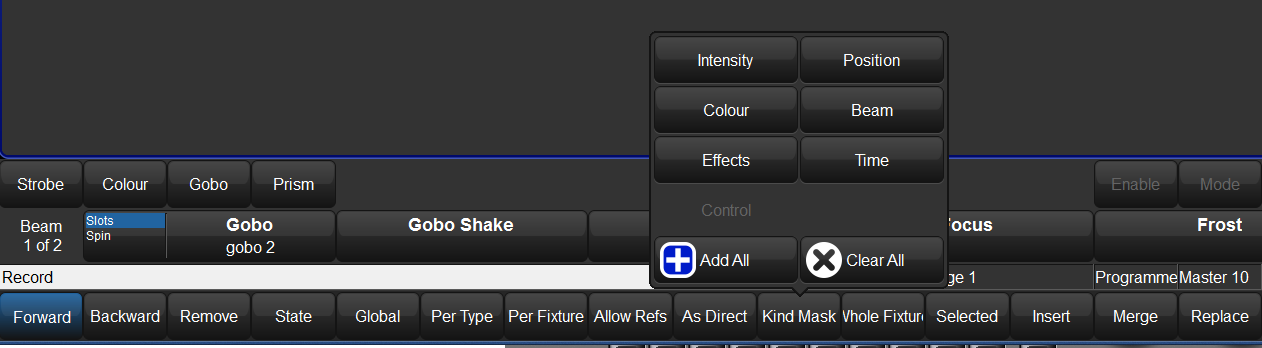
5. Touch (select) any empty palette box in the desired directory (Intensity, Position, Colour or Beam)
6. Press SET and enter a name followed by ENTER
7. Clear the Programmer by pressing the CLEAR key.
Example: If you wanted to store Position, Colour and Beam information into the Position Directory, you would create the look in your Programmer and
1. Press RECORD
2. Select POSITION, COLOR and BEAM from the Record toolbar (bottom of the right monitor)
3. Touch (select) any empty Palette in the Position Directory
4. Press SET and enter a name followed by ENTER
5. Clear the Programmer by pressing the CLEAR key.
[/vc_column_text][/vc_column][/vc_row][vc_row][vc_column width=”1/1″][vc_text_separator title=”To Copy Palettes” title_align=”separator_align_left” color=”blue” style=”double”][/vc_column][/vc_row][vc_row][vc_column][vc_column_text]
1. Select the palette you wish to copy
2. Press the COPY key
3. Select any empty palette in the same directory window
[/vc_column_text][/vc_column][/vc_row][vc_row][vc_column width=”1/1″][vc_text_separator title=”To Move Palettes” title_align=”separator_align_left” color=”blue” style=”double”][/vc_column][/vc_row][vc_row][vc_column][vc_column_text]
1. Select the palette(s) you wish to move
2. Press the MOVE key
3. Select any empty palette in the same directory window
[/vc_column_text][/vc_column][/vc_row][vc_row][vc_column width=”1/1″][vc_text_separator title=”To Delete Palettes” title_align=”separator_align_left” color=”blue” style=”double”][/vc_column][/vc_row][vc_row][vc_column][vc_column_text]
1. Select the palette(s) you wish to delete
2. Press the DELETE key
3. If you are prompted to confirm the deletion, you can touch OK or press ENTER
[/vc_column_text][/vc_column][/vc_row][vc_row][vc_column width=”1/1″][vc_column_text css=”.vc_custom_1407361763611{background-color: #ff0033 !important;}”]
Next up…
[/vc_column_text][/vc_column][/vc_row]


1 thought on “Hog QuickStart: Palettes”
Comments are closed.